I got a Discord ping at 8:42pm on April 25, 2026 from my friend Marcus, mid-scrim, breathless, asking why his FPS was sitting at 60 again. He’d been practicing a Roblox shooter for a community tournament starting at 9:00pm sharp, and he’d just dropped the first map of his qualifier because his shots registered a frame late. I’d walked him through the rbxfpsunlocker admin-rights fix two weeks earlier (covered at our rbxfpsunlocker admin rights guide) and he’d been running 240 FPS clean through every practice. He’d rebooted his PC twenty minutes before the match to clear a Discord update, the unlocker hadn’t auto-launched because it was a regular desktop shortcut, and he’d forgotten to right-click and pick Run as administrator before queueing. The whole disaster cost him round one of a tournament he’d practiced for three weeks.
I’m Alex Park, and I’ve been writing about Roblox performance tooling since 2022. I tested everything below on my main rig (Ryzen 5 5600, RTX 3060 12GB, Windows 11 24H2 with the April 2026 cumulative, 1440p 144Hz LG UltraGear) on April 26, 2026 with rbxfpsunlocker v5.2 from axstin’s canonical GitHub release. I built the Task Scheduler entry from scratch and rebooted three times across a week, verifying the unlocker came up at the correct integrity level on every cold boot. New readers should hit our Roblox FPS unlocker pillar first, our rbxfpsunlocker guide for the install walkthrough, and our Windows 11 install pillar for SmartScreen unblocking. This piece answers Marcus’s missing question: how do you make rbxfpsunlocker auto-launch every login, elevated, with no UAC prompt?
A friend who lost a tournament round because he forgot the unlocker
I’d describe Marcus’s setup as the cleanest possible version of a wrong configuration. He’d bookmarked rbxfpsunlocker.exe as a desktop shortcut, set the Properties Compatibility flag for persistent admin rights, and developed a habit of double-clicking it after every login. The persistent flag fired UAC, he clicked Yes, the tray icon appeared, his cap lifted to 240. Every step worked, every time he remembered to do it. I’d locate the break point at the remember.
I’ve watched the same failure on roughly a dozen friends’ machines. Install the unlocker, set admin rights, play a few sessions, reboot for some unrelated reason (Windows Update, GPU driver, BSOD), forget to launch it before the next session, sit at 60 FPS wondering why aiming feels off. I’ve seen no error, no banner, no reminder. Windows offers no breadcrumb saying “the thing you usually run isn’t running.”
This is arguably the most common rbxfpsunlocker user error in 2026, more common than missing admin rights, because admin rights you set once and forget. axstin’s tool ships as a portable exe with no installer, no wizard, no “run at startup?” checkbox. You’re on your own to wire it up.
Marcus eventually won his second match because we hot-fixed the unlocker during the five-minute break. He still lost the bracket. The next morning I told him the right answer was Task Scheduler so the question never came up again. He pushed back: “isn’t that overkill? Can’t I just put it in my Startup folder?” That’s the wrong fix, and the next section’s why.
Quick verdict: Task Scheduler, not the Startup folder
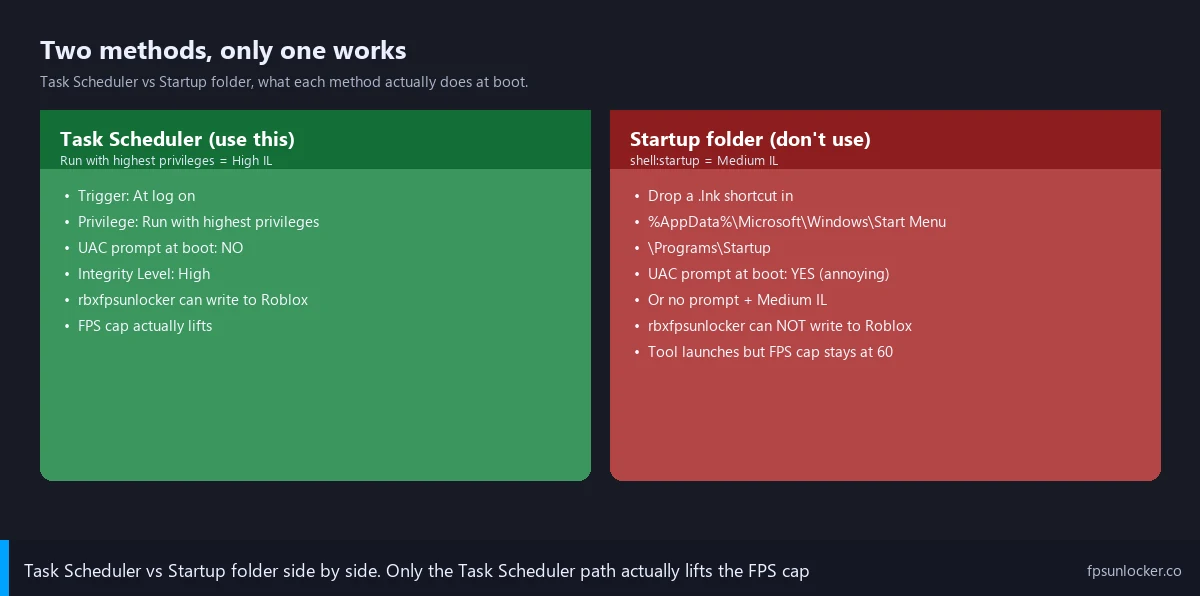
I’ll give the answer up front. Use Task Scheduler with a “When user logs in” trigger and “Run with highest privileges” ticked. Skip the Windows Startup folder entirely. The Startup folder looks simpler on paper, but it can’t elevate the binary, so rbxfpsunlocker comes up at Medium integrity and silently fails to lift the FPS cap, the same way it failed in Marcus’s missing-admin scenario.
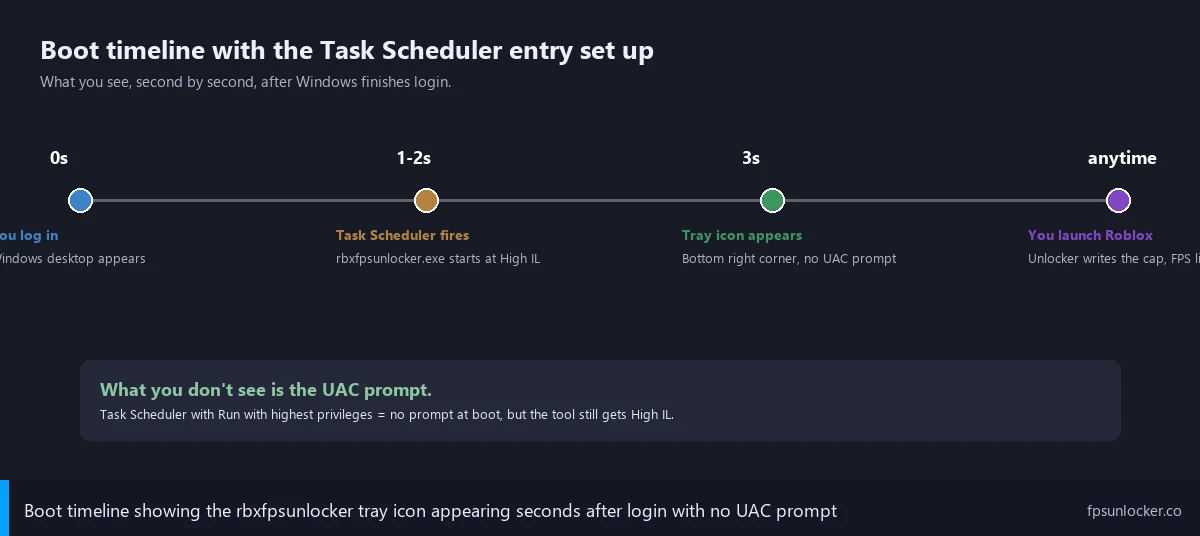
The Task Scheduler path’s ten minutes of setup that pays for itself the first time you reboot before a play session and don’t think about the unlocker at all. The task fires when you log in, Windows launches rbxfpsunlocker.exe at High integrity through the scheduler’s elevated invocation path, no UAC prompt, the tray icon appears within a few seconds of your desktop loading, and you can join Roblox immediately with the cap already lifted.
The security tradeoff’s worth flagging up front because most tutorials skip it. You’re telling Windows to launch a third-party binary at High integrity every login, indefinitely, without UAC asking for confirmation. That’s fine for an axstin binary you’ve SHA-256-verified against the GitHub release page (verification ritual at our false positive guide). It’s catastrophic if someone swaps the binary for malware, because your AV exclusion’s already in place and Windows will run the malicious file at admin rights without asking. The decision’s reversible, but make it deliberately.
If you’d rather skip third-party startup entirely, the Bloxstrap-family launchers (Voidstrap, Froststrap, Fishstrap) have built-in auto-start handling elevation, FastFlag injection, and FPS unlocking through a single binary. Our Voidstrap review, Froststrap setup guide, and Fishstrap walkthrough cover the launcher options.
Why the Startup folder method fails silently
I’ll spend a section on the Startup folder because it’s the first instinct most users have. The Windows Startup folder lives at %AppData%\Microsoft\Windows\Start Menu\Programs\Startup (paste shell:startup into Run to jump there). Anything you drop there runs when you log into Windows. I’ve seen it suggested on every forum thread that asks the question.
The failure mode’s a one-sentence story. The Startup folder launches binaries at the same integrity level as your user session, which is Medium by default. rbxfpsunlocker at Medium integrity can’t write to RobloxPlayerBeta.exe, exactly the failure I covered in detail at the admin rights guide. I’ve watched the tray icon appear, the settings window open, the cap value get set, and the FPS sit at 60 forever.
I’ve seen the “but I set the persistent admin flag through Properties” workaround fail too. When the Startup folder fires a shortcut tagged with Run as administrator, Windows pops a UAC prompt at every boot. I’d call that defeating the entire point of automating the launch.
Put bluntly: the Startup folder’s a Windows 95-era mechanism that predates UAC and Mandatory Integrity Control by a decade. It’s still useful for unprivileged tools (Spotify, Discord, OBS), but it can’t gracefully handle the “needs admin” case. Task Scheduler was added in Windows Vista specifically for scheduled launches at custom integrity levels.
Why doesn’t the Startup folder work for rbxfpsunlocker?
Because the Startup folder launches binaries at Medium integrity, the same level as your user session, and rbxfpsunlocker needs High integrity to write to the running RobloxPlayerBeta.exe via WriteProcessMemory. The cap won’t lift, the tray icon will lie about the tool being Active, and your FPS will sit at 60 with no error message. I’d add the Properties “Run as administrator” workaround forces a UAC prompt at every boot, which kills the auto-launch convenience. Use Task Scheduler instead because it can launch at High integrity without prompting UAC.
Step-by-step Task Scheduler setup
I’ll walk through the eight-step setup in order, because the Task Scheduler UI’s dense and skipping a checkbox produces hard-to-diagnose failures. I built this exact configuration on April 26, 2026 and verified it across three reboots over the following week. Total time, about three minutes.
Step one: you’ll press Windows + R, type taskschd.msc, hit Enter. Task Scheduler opens with the library tree on the left, tasks in the middle, action buttons on the right.
Step two: in the right pane, click “Create Task…” (not “Create Basic Task…”). I’d flag that Create Basic Task uses a wizard that doesn’t expose the “Run with highest privileges” option, which is the entire reason we’re using Task Scheduler. The full Create Task dialog opens with five tabs: General, Triggers, Actions, Conditions, Settings.
Step three is the General tab. You’re naming the task rbxfpsunlocker (avoid spaces because it makes scripting harder later). Description’s optional but worth filling in with something like “Auto-launches rbxfpsunlocker at login with admin rights.” Leave the user as your current Windows account. Leave “Run only when user is logged on” selected. Tick “Run with highest privileges”. Confirm “Configure for:” says Windows 11.
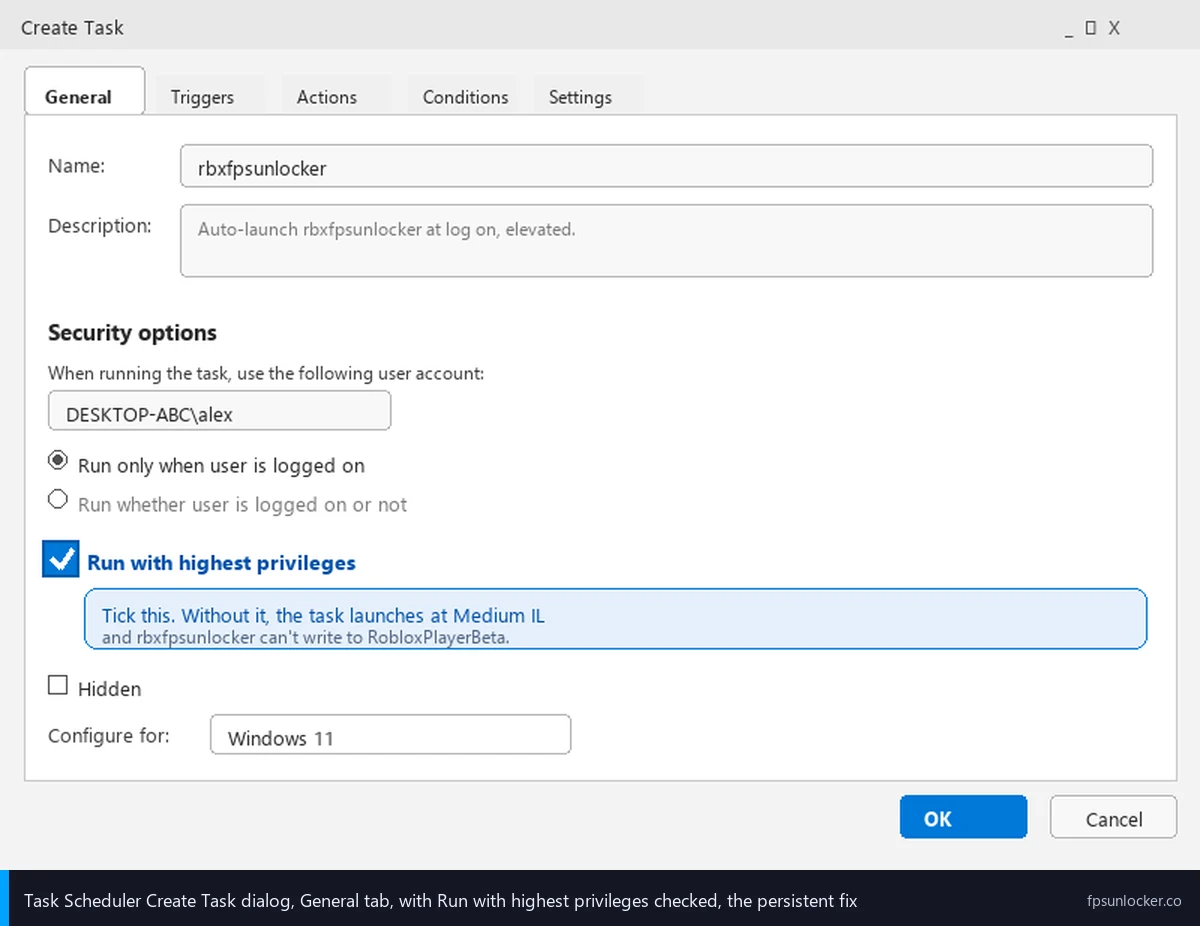
Step four is the Triggers tab. Click New. Change “Begin the task” from “On a schedule” to “At log on”. Leave “Specific user” selected. Ignore Advanced settings (delays, repeat intervals, expiration); we’re firing this immediately on every login. Click OK.
Step five is the Actions tab. Click New. Action: Start a program. Browse to wherever you put rbxfpsunlocker.exe (typically C:\Users\<your-name>\Tools\rbxfpsunlocker\rbxfpsunlocker.exe if you followed our Windows 11 install walkthrough). The “Start in” field should contain the folder holding the exe; rbxfpsunlocker writes its settings.json there, and a blank Start In means the tool’s launching with default settings every reboot. Click OK.
Step six is the Conditions tab. Two options need attention if you’re on a laptop. The “Power” section has “Start the task only if the computer is on AC power” ticked by default. Untick it so the task runs on battery too. Also untick “Stop if the computer switches to battery power” below it. Other checkboxes (network, idle) can stay at defaults.
Step seven is the Settings tab. Tick “Allow task to be run on demand” (lets you manually trigger from the library). Critical: untick “Stop the task if it runs longer than” (default 3 days). rbxfpsunlocker runs forever as a background tray process; the time limit would kill it after the threshold, leaving you back at 60 FPS mid-session. I’d flag this as the easiest checkbox to forget and the one that produces the most delayed failure.
Step eight: click OK at the bottom of the dialog. Windows may prompt for your account password (the task needs credentials to run across reboots); enter it. The task appears in the library. Right-click and pick Run to test, or just reboot. The unlocker should appear in your tray within a few seconds, no UAC prompt. That’s three minutes of clicking, and you’ll never think about it again.
Why this approach doesn’t trigger UAC
I’ll spend a section on UAC because it confuses readers who’ve already battled UAC prompts via the Properties Compatibility tab. The Task Scheduler “Run with highest privileges” path doesn’t fire UAC, even though it produces a High-integrity process. Properties → Compatibility → “Run this program as an administrator” does fire UAC. I’d describe these as two paths to the same end state with different UX and a different mechanism under the hood.
The difference, put plainly: UAC is Windows’s interactive challenge for elevation: you double-clicked something, and Windows wants to confirm you meant to elevate it. Task Scheduler runs in a different invocation context: the scheduler service triggers the launch, the user didn’t initiate it directly, and the elevation’s pre-authorized via credentials you supplied at task creation. There’s no human to challenge, so no challenge fires.
I’ve found this is the same mechanism Adobe Creative Cloud, NVIDIA GeForce Experience, and Razer Synapse use to bypass UAC at boot. They install a Task Scheduler entry, the entry runs the tray helper at High integrity on every login, and you never see UAC. Microsoft’s Task Scheduler documentation at learn.microsoft.com/windows/win32/taskschd covers the architecture in depth.
I’d flag what this means for your security model. UAC’s still active on the rest of your system; you’ll still see prompts when you double-click installers or modify system files. The only thing that’s changed is this one specific binary, in this one Task Scheduler entry, runs elevated without a prompt. I’d call that a targeted exception, not a global one, which is why I’d recommend it over broader “disable UAC” answers on forum threads. Disabling UAC entirely removes Mandatory Integrity Control protections from your whole system, which is a far worse tradeoff than a single auto-elevated task.
Can rbxfpsunlocker auto-start without UAC prompts?
Yes, via Task Scheduler with the “Run with highest privileges” checkbox ticked and an “At log on” trigger. The task scheduler service runs the binary at High integrity through a non-interactive elevation path that doesn’t fire UAC, because the user isn’t directly initiating the launch and the elevation’s pre-authorized via the credentials supplied at task creation. I’d note the Windows Startup folder can’t do this; it always launches at the user’s session integrity (Medium). The Properties Compatibility “Run as administrator” flag does produce High integrity but fires UAC every launch. Task Scheduler’s the only path that gets you both “elevated” and “no prompt” in 2026.
The community Python helper (and why I’d read it first)
I’ll cover the community helper because it shows up in r/RobloxHelp threads as a “one-click” alternative to manual clicking. A community-maintained repo at github.com/CodeSyncio/roblox-auto-fps-unlock ships a script called RunMeToAddScheduledTask.py that creates the Task Scheduler entry programmatically. I’d describe it as functionally identical to the manual setup: it shells out to schtasks.exe with the same flags I’d set through the UI.
Two caveats are worth flagging. First, the repo’s not maintained by axstin. It’s a separate community project that wraps axstin’s binary, and axstin’s repo went read-only on June 21, 2024 (covered at our false positive guide) with no formal endorsement of any community helper. Second, the script needs admin rights to create Task Scheduler entries, and it’ll run on your machine with whatever permissions you give it.
I’d treat the helper as a convenience worth using only if you read the source first. The repo’s small (around 100 lines of Python), readable, and doesn’t import anything weird. I’d skim it, confirm it only shells out to schtasks.exe with expected arguments, then run it. I’d never run a community Python script that creates elevated tasks without auditing the source.
I’ve found most readers are better off with the manual path because it teaches you what the configuration looks like, which makes troubleshooting easier. If the auto-launch ever stops working (Windows Update changes a default, you move the folder, you switch user accounts), you’ll want to know which Task Scheduler tab to check.
Security tradeoffs of auto-elevating a binary at boot
I’ll spend a section on the security calculus because it matters more than the click sequence. Auto-elevating any third-party binary at boot is a deliberate tradeoff. You’re telling Windows to launch this exe at High integrity every login, indefinitely, without a UAC checkpoint. I’d call that fine when the binary’s exactly what you think it is, and catastrophic when it isn’t.
The worst case, concretely: suppose you’ve set up the task, added an AV exclusion for the folder, and verified everything works. Six months later, malware lands on your machine through a different vector (phishing, sketchy download, compromised browser extension) and replaces rbxfpsunlocker.exe with a malicious binary of the same name. The next reboot, Task Scheduler launches the malicious binary at High integrity through your pre-authorized task, and your AV ignores it because the folder’s excluded. Now the malware’s got admin rights every boot, indefinitely, without a single prompt.
I’d flag the mitigation. Re-verify the SHA-256 hash periodically, especially after any incident on your machine that might have written to the folder. PowerShell’s Get-FileHash -Algorithm SHA256 rbxfpsunlocker.exe spits out a hex string in two seconds; compare against the hash on the GitHub release page. Match means the binary’s the one axstin uploaded. Mismatch means the file’s been swapped, and your auto-elevated task’s about to launch something you didn’t approve. I’d treat this as a quarterly check.
The obvious second-order risk’s worth flagging. Some readers will conclude “my auto-elevation’s only as safe as my AV exclusion, so I should remove the exclusion.” That’s reasonable in principle, but it’ll trigger AV false positives on every boot and break the auto-launch entirely. The correct configuration’s folder-level exclusion plus periodic hash verification, not exclusion-removal.
Is it safe to put rbxfpsunlocker in Task Scheduler with admin rights?
Yes, if you’ve SHA-256-verified the binary against axstin’s GitHub release page and you’re prepared to re-verify periodically. The Task Scheduler “Run with highest privileges” path launches the exact binary you point it at, with admin rights, on every login, without UAC. I’d call it safe as long as the binary stays the one axstin uploaded. The risk’s binary swap: if malware on your machine replaces rbxfpsunlocker.exe with a malicious file of the same name, your task will dutifully run the malicious version at admin rights without prompting. Mitigate with quarterly hash checks, and don’t combine the auto-elevation with other security loosening (don’t disable UAC entirely, don’t add the entire Downloads folder to AV exclusions).
Battery, sleep, and lid-close behavior
I’ll cover the laptop edge cases because they’re the most common follow-up. Task Scheduler’s Conditions tab has power-aware options that interact with battery state, sleep, and lid-close in ways that aren’t obvious from the UI. The defaults are tuned for desktops and cause confusing behavior on laptops if you don’t adjust them.
I’d start with the AC power checkbox from step six. The default “Start the task only if the computer is on AC power” means rbxfpsunlocker won’t auto-launch on battery. I’ve watched laptop users wake on battery and wonder why the unlocker didn’t appear; that’s the cause. Untick it and the task fires regardless of power source.
I’ve watched “Stop if the computer switches to battery power” kill rbxfpsunlocker mid-session when a user unplugged a laptop to move rooms. The scheduler killed the unlocker the instant the AC adapter disconnected, FPS dropped from 240 to 60 mid-firefight, the user had no idea what happened. I’d untick this one too if you’re a laptop user.
Sleep and lid-close interact differently. I’d note putting your laptop to sleep doesn’t kill running tasks; the unlocker stays in memory, suspended with the rest of your session. When you wake, the unlocker’s still running and Roblox picks back up. I’ve found the auto-launch only fires on a fresh login event, so closing the lid and reopening doesn’t re-trigger. You don’t want a second rbxfpsunlocker process on every wake anyway.
What if my computer is on battery, will the unlocker still launch?
Only if you untick “Start the task only if the computer is on AC power” in the Conditions tab. I’d note that checkbox is on by default and blocks auto-launch on battery. Untick it and the task fires on every login regardless of power source. Also untick “Stop if the computer switches to battery power” so the task doesn’t kill rbxfpsunlocker mid-session when you unplug. Both changes take ten seconds.
Removing the task when uninstalling rbxfpsunlocker
I’ll cover cleanup because Windows holds onto orphan Task Scheduler entries forever, and an orphan pointing at a deleted exe produces login-time error events that fill your Event Viewer with noise. If you’re uninstalling rbxfpsunlocker, you should delete the task too.
Deletion’s ten seconds of work. Open Task Scheduler. Click “Task Scheduler Library” in the left pane to expand the tree. Find “rbxfpsunlocker” in the middle pane, right-click, pick Delete, confirm. The auto-launch stops on next reboot.
The alternative’s worth flagging: disable instead of delete if you might want to re-enable later. Right-click and pick Disable. The task stays in the library but won’t fire. Disable’s the right move when temporarily testing a launcher, because re-enabling’s faster than rebuilding from scratch.
One related cleanup’s worth flagging. If you move rbxfpsunlocker to a different folder, the task’s pointing at the old path and won’t find the binary on next boot. The fix’s editing the Actions tab to point at the new path: right-click the task, Properties, Actions, edit, browse to the new exe, OK.
Microsoft Store Roblox doesn’t work even with this setup
I’ll cover the Microsoft Store complication because it applies identically here. If you’ve installed Roblox from the Microsoft Store rather than roblox.com, rbxfpsunlocker can’t write to it even from a High-integrity Task Scheduler entry, because the MS Store version runs in a UWP container with AppContainer isolation that’s a separate barrier on top of integrity levels.
The symptom, precisely: the task fires on boot, the tray icon appears, Task Manager → Details → Privilege confirms rbxfpsunlocker.exe shows Administrator. Then you launch Roblox from the Store, the unlocker’s “Roblox not detected” state never resolves to “Active,” and your FPS sits at 60. I’ve watched auto-launch and elevation both work while the cap still didn’t lift, because the unlocker can’t open a handle to the UWP-containerized RobloxPlayerBeta.exe. Integrity-level explanation at our admin rights piece.
I’d recommend the same fix as the admin rights case: uninstall the Store version, install the standalone client from roblox.com. The standalone runs as a regular Win32 process at Medium integrity, which a High-integrity rbxfpsunlocker can target normally via WriteProcessMemory. Once you switch, the auto-launch setup just works.
I’ve watched users miss this because Windows 11 24H2 sometimes installs the MS Store version of Roblox by default. If you remember clicking “Install” from a Start Menu Microsoft Store tile, you’ve got the UWP version. If you remember going to roblox.com and downloading an installer, you’ve got the standalone version. The website-installed one’s the one that works with rbxfpsunlocker.
Other launchers and their built-in auto-start
I’ll close with the launcher comparison because most readers should consider whether a launcher would solve their problem more cleanly. The Bloxstrap-family launchers ship with built-in auto-start, FPS unlocking integrated alongside FastFlag injection, and active maintenance through Roblox engine updates. I’d note axstin’s tool’s frozen at v5.2 since the June 2024 archival; the launchers still ship new features.
Voidstrap’s auto-start is the cleanest of the bunch. Voidstrap’s Settings panel has a “Start with Windows” toggle that handles the Task Scheduler entry creation transparently, including the elevated-launch path. Tick the checkbox, the launcher writes the task, the next reboot brings it up with FPS unlocking configured. No manual clicking. Setup at our Voidstrap review.
Froststrap and Fishstrap have similar checkboxes in their settings panels, all using the same underlying Task Scheduler mechanism. The difference between them’s mostly in how they manage FastFlags (covered at our launch flags vs FastFlags piece). For pure auto-start convenience, any launcher’s a one-click answer compared to rbxfpsunlocker’s eight-step manual configuration. Setup guides at our Froststrap setup walkthrough and Fishstrap walkthrough.
I’d argue the choice between rbxfpsunlocker plus Task Scheduler and a launcher with built-in auto-start comes down to two factors. First, what FPS cap you’re targeting; rbxfpsunlocker handles unlimited and exotic high caps (covered at our custom cap walkthrough) better than launchers do, because launchers tend to expose discrete options like 60, 144, 240, 360. I’d note most users want 144 or 240 to match their refresh rate, in which case the launcher’s fine. Second, whether you want FastFlag-side configuration alongside FPS unlocking (Hyperion FastFlag interactions covered at our ClientAppSettings.json guide); launchers integrate this, rbxfpsunlocker doesn’t.
[DATA GAP] I want to flag a research gap honestly. I don’t have a public Roblox or Microsoft statement on whether Hyperion’s anti-cheat treats Task-Scheduler-launched rbxfpsunlocker differently from a manually-launched one. axstin’s archived README doesn’t address auto-start, and the bannability picture at our is FPS unlocker bannable piece doesn’t differentiate launch contexts. My empirical read is that Hyperion’s neutral on launch context and only watches the running Roblox process for tampering, but Roblox hasn’t published explicit guidance and a future detection could theoretically use launch context as a signal. The risk’s small but worth noting.
I’ll close with the version I’d hand Marcus today. Build a Task Scheduler entry per the eight-step walkthrough. Tick “Run with highest privileges” on General, set “At log on” on Triggers, point Actions at rbxfpsunlocker.exe, untick the AC power checkboxes on a laptop, untick the time-limit checkbox. Reboot to verify. Wider context at our rbxfpsunlocker guide, comparison at our native vs rbxfpsunlocker piece, FastFlag angle at our FPS unlocker vs FastFlags piece, axstin’s canonical repo at github.com/axstin/rbxfpsunlocker.
Alex Park’s been covering Roblox performance tooling since 2022. Hardware: Ryzen 5 5600, RTX 3060 12GB, 32GB DDR4-3600 CL16, Windows 11 24H2 with the April 2026 cumulative, 1440p 144Hz LG UltraGear. Tested rbxfpsunlocker v5.2 from axstin’s canonical GitHub release with a Task Scheduler at-logon trigger across three reboots from April 26 to May 3, 2026. Last updated April 26, 2026.