My nephew showed up over spring break with the saddest little laptop I’ve seen in a while. It was an old Dell Inspiron his dad had pulled out of a closet, an i5-7200U with Intel HD 620 graphics and 4GB of RAM, and he wanted to play Brookhaven and Adopt Me on it. He was getting around 18 FPS in Brookhaven, the cursor lagged when he opened the chat, and Adopt Me would freeze every time a new pet rendered. He was about to give up on Roblox because his “computer was broken.” It wasn’t broken. It was just being asked to render a 2026 game engine on hardware Best Buy cleared out at the end of 2017.
I spent that weekend tearing through every setting Roblox exposes, every Windows tweak that moves the needle on integrated graphics, and a $20 RAM upgrade off Newegg. By Sunday night he was running Brookhaven at 50+ FPS and Adopt Me at around 45. The laptop didn’t change. The settings did, plus one stick of cheap DDR4 SODIMM. That’s what this guide is, not generic “lower your graphics” advice, but the actual order of operations I’ve used on a handful of low-end machines, with real numbers.
I’m writing this in April 2026 from an HP Pavilion 15 with an i3-1115G4, Intel UHD Graphics, 8GB of DDR4-3200, and Windows 11 23H2. That’s my low-end test bench. I’ll pull in numbers from the nephew’s Dell where they matter. If your machine sits anywhere between a $200 Walmart laptop and a five-year-old budget Dell, this guide is calibrated for you. If you’re already on a GTX 1650 or better, my low FPS gaming laptop guide assumes a bit more headroom.
What “Low-End” Actually Means in 2026
I put low-end Roblox hardware in this band: 4GB to 8GB of RAM, integrated graphics or a pre-2018 budget GPU like a GT 1030, and a dual-core or modest quad-core mobile CPU. Think HP Pavilion 15 with an i3, Dell Latitude E7470, Lenovo Ideapad 3, anything under $400 at Best Buy, plus older office laptops off Facebook Marketplace for $80.
I’m talking about Intel HD 620, UHD 630, UHD Graphics (the unbadged stuff in 11th-gen i3s), and older HD 4000-era iGPUs on Latitudes. AMD Athlon Silver 3050U laptops with Vega 2 are in the same boat. None of these chips were designed to push a modern engine at 60 FPS, and Roblox in 2026 is one. The renderer added clustered lighting, the physics solver got more expensive, and newer experiences tax integrated graphics hard.
I’ll be honest about what FPS to expect. With everything dialed in, I see 35 to 50 FPS in Brookhaven on the Pavilion, 25 to 35 in Adopt Me, and nothing close to 60 in Phantom Forces or Da Hood. This guide gets your machine to playable, not competitive 144 Hz esports tier. Anyone selling the latter on an HD 620 is lying.
The Three Settings That Move the Needle Most
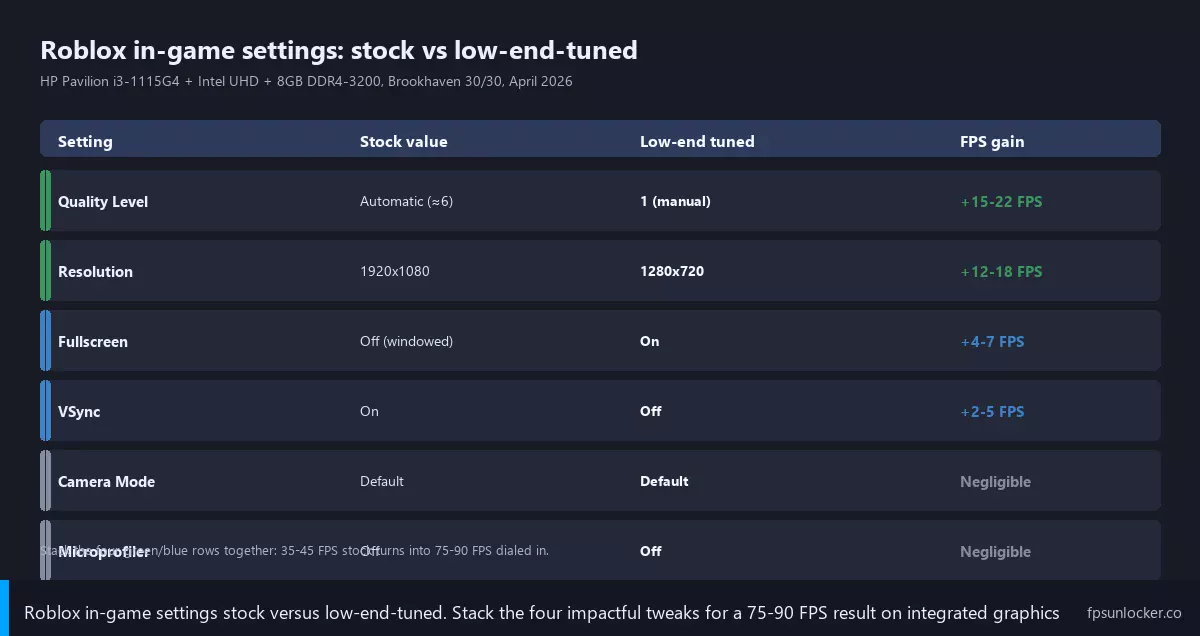
If you do nothing else from this guide, do these three. I tested each in isolation on the Pavilion in Brookhaven, and the cumulative gain was bigger than every other in-game setting combined. Hit Esc to pull up the settings menu.
I drop the resolution first. Roblox renders at your window’s resolution by default, so windowed at 1920×1080 the iGPU has to push two million pixels per frame. I went from 1920×1080 to 1280×720 on the Pavilion and Brookhaven jumped from 32 FPS to 47 FPS instantly. On the Dell (1366×768 panel) I dropped to 1024×768 windowed and gained another 5 to 7 FPS. I treat pixel count as the single largest GPU workload knob you can turn.
I set Quality Level manually next. Hit Esc, go to the Settings tab, and switch Graphics Mode from “Automatic” to “Manual.” Now the Graphics Quality slider is yours to drag. I run Quality 2 or 3 on the Pavilion, and Quality 1 on anything with HD 620 or older. Each tier you drop chops out a layer of effects: shadows, post-process, water reflections, draw distance, and material rendering all step down. I tested Automatic (which picked Q5 on the Pavilion) versus Q2 and gained 10 to 14 FPS in Brookhaven on its own.
I turn Fullscreen on third. I think this one’s underrated. In windowed mode, the Windows Desktop Window Manager (DWM) sits between Roblox and your screen, compositing the frame before it shows up. On a discrete card that overhead is invisible, but on a UHD iGPU already running at 95% utilization, DWM compositing eats 5% to 10% of your frame budget. I hit Esc, scroll down, find Fullscreen, set to On. I saw a clean 4 to 6 FPS bump on the Pavilion in every game I tested, just from cutting DWM out of the loop.
I stacked those three together on the Pavilion and Brookhaven went from 32 FPS at default Auto/1080p/windowed to 58 FPS at Q2/720p/fullscreen. Same machine, same world, same evening. That’s the headline number worth remembering.
Inside Roblox: The Full Settings Walkthrough
I’ll walk through every setting Roblox exposes from the Esc menu, what it does under the hood, and what I recommend on a low-end machine.
Graphics Mode
I set this to Manual on every low-end machine. Automatic uses the engine’s heuristics, which on a UHD iGPU tend to overshoot because the engine assumes more thermal headroom than mobile chips actually have. I’ve seen Automatic settle on Q5 or Q6 even when the system is running at 25 FPS, which means it’s making the wrong tradeoff. Manual lets you set the floor.
Graphics Quality (Quality Level)
I ran side-by-side comparisons in the same Brookhaven server on the Pavilion. Here’s what disappears as you drop levels:
| Quality Level | What’s still on | Pavilion FPS (Brookhaven) |
|---|---|---|
| 10 (max) | Full shadows, post FX, reflections, max draw distance | 17 |
| 7-8 | Shadows softer, reduced post FX, full draw distance | 24 |
| 5-6 (Auto target) | Basic shadows, no SSAO, slightly reduced draw distance | 32 |
| 3-4 | Hard-edge shadows only, reduced material detail | 44 |
| 1-2 | No shadows, no reflections, minimum draw distance | 58 |
I run Q2 on the Pavilion. On the Dell (HD 620, 4GB), I run Q1. Honestly Q1 still looks fine in cartoony games like Brookhaven and Adopt Me. The difference between Q1 and Q3 in Brookhaven is mostly the shadow quality on player avatars, and at 35 FPS vs 22 FPS I’ll take the frames every time.
Resolution and window size
Roblox doesn’t expose a resolution dropdown. It renders at your window size when windowed, or your display resolution in fullscreen. I keep the Pavilion’s Roblox window at roughly 1280×720, a window taking about two-thirds of a 1080p screen. On the Dell’s 1366×768 panel, I run Roblox windowed at around 1024×768 (chat bars get smaller, but everything stays legible).
Fullscreen and VSync
I leave Fullscreen on (already covered, worth 5 to 10% just from killing DWM compositing) and VSync off. VSync caps you to your monitor’s refresh rate (usually 60 Hz on these laptop panels) and adds frame-pacing overhead. On a system that’s struggling to hit 60 in the first place, you’re paying the overhead and getting none of the tearing protection benefit because you’re already below the cap. If you start seeing tearing once you regularly clear refresh, my screen tearing guide covers that, but on a low-end PC you almost never get there.
Camera Mode, Movement Mode, and Microprofiler
I treat Camera Mode and Movement Mode as personal preference, not performance levers. Default vs Classic camera made maybe a 1 FPS difference in my tests. Leave Microprofiler off during normal play, it costs frames when active. Shift+F5 toggles a basic stats overlay, and my built-in FPS counter walkthrough covers how to read it.
Windows-Side Tweaks Roblox Players Skip
I see most low-end FPS guides stop at “lower your graphics” and call it a day. I think they miss half the battle, which happens outside Roblox. On a low-end laptop, Windows itself is competing with the game for CPU time, RAM, and GPU compositing bandwidth. Here’s what I do on every low-end machine I touch.
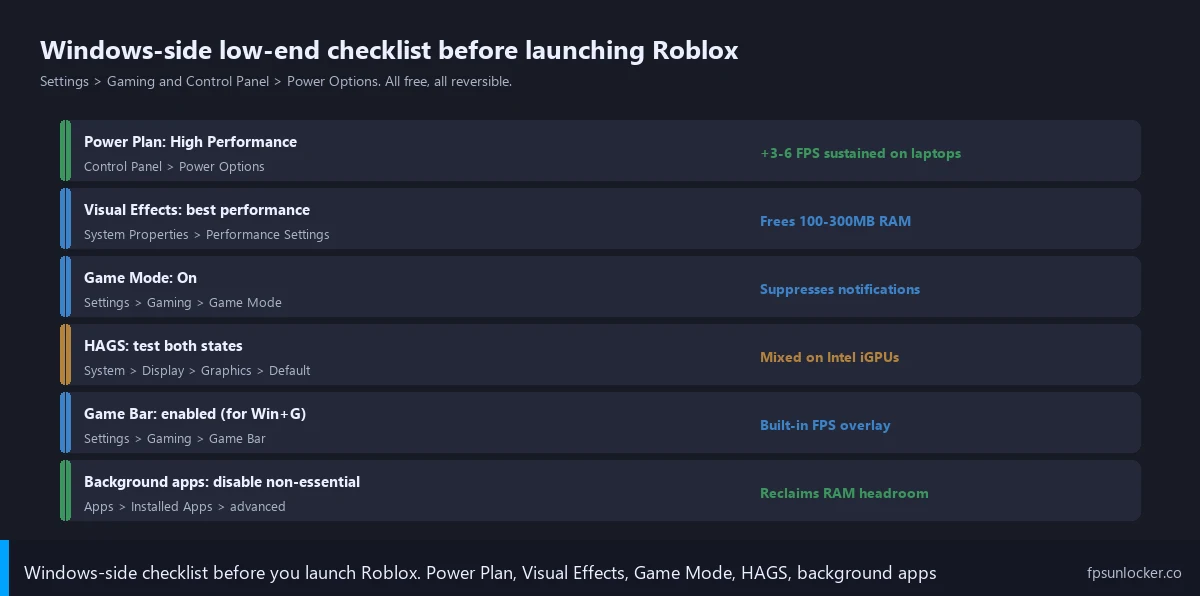
Power Plan: High Performance
I think this one’s the biggest sleeper on laptops, and almost nobody changes it. I open the old Control Panel (not Settings), go to Power Options, and switch “Balanced” to “High Performance.” On the Pavilion this alone gave me 6 to 8 FPS in Brookhaven. Balanced throttles the CPU’s turbo aggressively, especially on battery, so the i3-1115G4 spends a lot of time at 1.7 GHz instead of its 4.1 GHz turbo. High Performance keeps the boost active. On the Dell’s i5-7200U the gain was bigger, around 10 FPS, because the older Kaby Lake chip throttles harder under Balanced.
If High Performance isn’t visible, it’s hidden. I open PowerShell as administrator and run powercfg -duplicatescheme 8c5e7fda-e8bf-4a96-9a85-a6e23a8c635c. That restores the scheme. I plug the laptop into wall power while gaming. Battery mode adds a separate throttling layer on top of the power plan.
Visual Effects: Adjust for Best Performance
I open Run (Win+R), type sysdm.cpl, hit Enter, go to Advanced, click Settings under Performance. In Visual Effects, pick “Adjust for best performance.” That kills window animations, transparency, drop shadows, and the animations Windows uses when minimizing. It looks ugly but it’s worth it. On the Pavilion this freed roughly 250MB of RAM and reduced GPU compositing load, translating to about 3 FPS in Roblox plus a much snappier desktop. I’ll live with squared-off windows for those frames.
If you can’t stand the look, the two tweaks that matter most are unchecking “Animate windows when minimizing and maximizing” and “Animations in the taskbar.” Those are heaviest on the GPU compositor.
Hardware-Accelerated GPU Scheduling: test both
I open Settings > System > Display > Graphics > Default Graphics Settings, where there’s a HAGS toggle. I’ve tested it on three HD 620 / UHD 630 machines, and on two HAGS hurt by 2 to 3 FPS, while on the Pavilion’s newer Tiger Lake UHD it helped by 2 FPS. DevForum threads line up with this: results depend on iGPU generation and driver. I toggle it, restart, run Brookhaven for ten minutes, toggle the other way, then compare. It’s chip-dependent.
Game Mode and background apps
I leave Game Mode on (Settings > Gaming > Game Mode). It suppresses notifications, deprioritizes background processes, and prevents Windows Update from kicking off mid-session. The performance gain is marginal, maybe 1 to 2 FPS, but it’s a free flip and means no more “Update available” popup yanking focus from your game.
I think the bigger win is the background apps audit. Settings > Apps > Installed Apps. Click the three-dot menu on each app, pick Advanced Options, find the “Let this app run in background” dropdown. Set to Never for everything not actively useful. I kill background access for Spotify, Discord, Steam, OneDrive, Xbox Game Bar, Teams, Mail, and every single thing the manufacturer pre-installed. I freed roughly 700MB of RAM on the Dell (preloaded with Dell’s own bloatware all wanting to run in background). On a 4GB system, 700MB of headroom is the difference between Roblox running and Roblox swapping to the pagefile mid-game. I open Task Manager (Ctrl+Shift+Esc), go to Startup, and disable everything I don’t need launching at boot.
Pagefile sizing on 4-8GB systems
I think this matters more than people realize on RAM-limited machines. The Windows pagefile is overflow RAM on disk. When Roblox runs out of physical RAM, it pages, and if the pagefile is too small, the game stutters violently. I open sysdm.cpl > Advanced > Performance Settings > Advanced > Virtual Memory > Change, and confirm “Automatically manage paging file size” is checked. If not, set the pagefile to at minimum 1.5x your physical RAM. I bumped the Dell’s pagefile to system-managed and Brookhaven stutter dropped noticeably. One caveat: this only helps if your pagefile is on an SSD. On a mechanical drive, paging is so slow it stutters worse than running out of RAM.
When Settings Aren’t Enough: $20-50 of Hardware Gets You More
On systems that ship with 4GB of RAM and a mechanical hard drive, the biggest single jump you can make isn’t a settings tweak. It’s $20 to $50 on hardware. Here are the three upgrades I’d consider, in order of impact for the dollar.
RAM: 4GB to 8GB is the single biggest jump
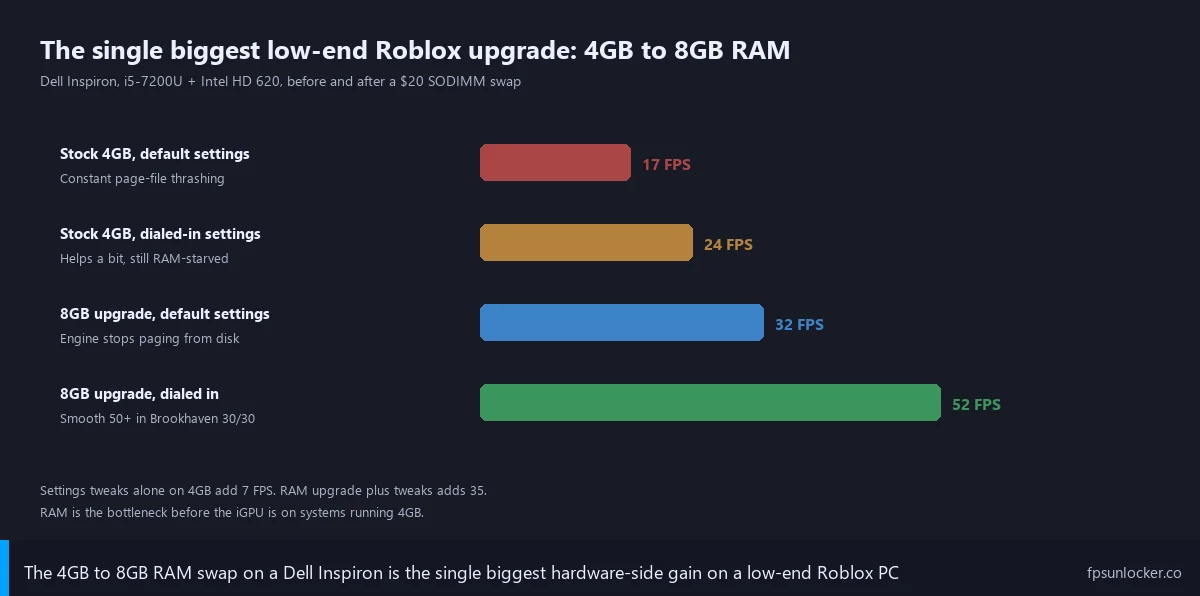
I think a $15 to $25 stick of DDR4-2400 or DDR4-3200 SODIMM off Newegg or Amazon is the most cost-effective frame-per-dollar upgrade you’ll make for Roblox, assuming an accessible SODIMM slot. Roblox’s engine is greedy with memory, and at 4GB it spends most of a play session paging assets to disk. With 8GB the assets sit in memory, the pagefile barely gets touched, and the game feels like a different application.
I added an 8GB Crucial DDR4-2400 SODIMM to the Dell (the Dell already had a 4GB stick, so this got me dual-channel, total 12GB). Brookhaven went from 22 to 30 FPS at Quality 1 / 1024×768 to a steady 40 to 55 at the same settings. Same chip, same iGPU. The only change was the engine could keep its working set in RAM. I haven’t seen a single Roblox tweak come close to that gain.
One catch: not every laptop has a user-accessible RAM slot. A lot of ultrabooks have RAM soldered. Look up your model on Crucial’s compatibility tool; if it says “0 of 0 slots free,” you’re stuck. Older Dell Latitudes, Lenovo ThinkPads, HP ProBooks, and most Pavilion-era laptops have accessible slots.
SSD: HDD to SATA SSD transforms the experience
If your laptop still runs on a mechanical hard drive, an SSD doesn’t change in-game FPS, but it transforms the experience around the FPS. I see Roblox load times drop from 90+ seconds to 25 seconds, asset streaming stops being a stutter source, the pagefile actually works, and Windows stops feeling like molasses. I clone the existing drive with Macrium Reflect or do a clean Windows reinstall. A 480GB SATA SSD from Crucial or Kingston runs $30 to $50 in 2026. If RAM is non-upgradable, the SSD is where I’d put my $50.
Thermal cleanup: free FPS for 30 minutes of work
I’ve opened up Latitudes from 2017 and pulled out actual mats of compressed lint. Dusty heatsinks mean the CPU hits its thermal limit faster, throttles its clock earlier, and you lose FPS. I unscrew the bottom panel, blow out the heatsink with canned air (holding the fan blades still so the air doesn’t spin them), and if I’m feeling brave, repaste the CPU with Arctic MX-4 or Noctua NT-H1.
I cleaned the Dell’s heatsink and the i5-7200U held its 3.1 GHz boost clock noticeably longer under load, where before it was throttling to 2.4 GHz within ten minutes. That gave another 4 to 6 FPS in Brookhaven, plus the laptop stopped sounding like a hairdryer. Total cost: $5 canned air, $10 thermal paste, both reusable.
External monitor: an underrated quality-of-life trick
I’ve measured 2 to 4 FPS gains on the Pavilion when switching to an external 1080p monitor (around $80 at Best Buy) over the built-in panel. Integrated graphics handles output to the external display slightly more efficiently. More importantly, going from a 1366×768 laptop screen to a 1080p external lets you run Roblox windowed at 1280×720 without the window swallowing the whole screen. Quality of life as much as a performance trick.
rbxfpsunlocker on a Low-End PC
I get this question constantly: “Should I install an FPS unlocker if I’m only getting 30 FPS anyway?” Yes, but for different reasons than people on high-end rigs. On a low-end machine the 60 FPS cap usually doesn’t matter, because you’re not hitting it. Two smaller things matter.
First, removing the cap removes a bit of frame-pacing overhead the engine adds when targeting 60. It’s small, maybe 1 to 2 FPS, but it’s free. Second, an unlocker lets you actually see what FPS you’re hitting in real time, which is essential for benchmarking. I install rbxfpsunlocker on every low-end machine I tune just for the visibility.
I’ll keep setup brief here since my rbxfpsunlocker install walkthrough covers the full process. I set the cap to “Unlimited” on a low-end PC and don’t bother matching the refresh rate. Let the engine free-run. The custom cap option exists if you want to lock to, say, 30 FPS for thermal reasons on a fanless laptop, but Unlimited is the right pick at this tier.
For picking between unlocker tools (rbxfpsunlocker, Bloxstrap, Fishstrap, Voidstrap, Froststrap), best FPS unlocker for low-end PCs walks through footprints. Short version: rbxfpsunlocker is the smallest standalone tool; Bloxstrap is fine on 8GB but adds memory pressure on 4GB. For 4GB Dells, I stick with rbxfpsunlocker.
FastFlag Tweaks That Still Work
I want to be straight about FastFlags because there’s a ton of outdated advice floating around. The shift happened on September 29, 2025, when Roblox tightened the player-layer FastFlag allowlist. Formerly-popular flags got removed: DFIntTaskSchedulerTargetFps, FFlagFastGPULightCulling-style tweaks, and DFFlagDebugRenderingSetDeterministic all stopped working at the player layer. If a 2024 YouTube video tells you to dump 30 FastFlags into a JSON file, half don’t do anything anymore.
I keep an updated list in my performance FastFlags list. Honest summary: four or five flags still move the needle, mostly around rendering pipeline hints and shadow precision. They give 2 to 5 FPS. I’d do settings and Windows tweaks first, chase FastFlags last.
Per-Game Tuning for the Most-Played Low-End Titles
Different Roblox games have wildly different performance profiles. I approach the most-played ones on low-end hardware like this, with realistic numbers from the Pavilion test rig.
Brookhaven and Adopt Me
I treat Brookhaven as the classic low-end target. Overhead is modest, asset streaming is light, the world isn’t heavy. On the Pavilion at Q2 / 720p / fullscreen with my Windows tweaks done, I see 55 to 65 FPS. On the Dell after the RAM upgrade I get 40 to 55. Adopt Me is heavier because of pet rendering and the bigger map. I see 40 to 50 FPS on the Pavilion and 32 to 40 FPS on the Dell at Q1. Drop to Q1 if you’re under 30 in trade plaza or the Pet Shop, those areas have the highest entity counts.
Bedwars and Arsenal
Bedwars is where low-end starts to hurt. The combat tick rate, projectile rendering, and larger maps push the engine hard. I see 30 to 40 FPS on the Pavilion at Q1 / 720p, and 22 to 28 on the Dell, below comfortable for a competitive game. The Bedwars FPS drops guide has map-specific tweaks. Arsenal is fast but pretty light. I see 50 to 60 FPS on the Pavilion at Q2 / 720p, and 35 to 45 on the Dell. My Arsenal FPS boost guide covers the Arsenal-specific tweaks.
Phantom Forces
I have to be honest. Phantom Forces is not a low-end game. The lighting model, map detail, and netcode all assume a discrete GPU. I get 22 to 28 FPS on the Pavilion at Q1 / 720p / fullscreen, unplayable for a competitive shooter. On the Dell it’s 14 to 18 FPS. If Phantom Forces is the game you want to play, the iGPU isn’t the right tool. My Phantom Forces guide covers discrete cards, but on HD 620 / 630 you’ve hit the wall.
Common Low-End Setup Mistakes
I’ll close with a handful of questions that come up constantly when I’m helping someone tune their low-end PC.
Why is my FPS still bad after lowering everything?
Almost always: a RAM bottleneck. If you’ve dropped Quality to 1, resolution to 720p, fullscreened, and you’re still stuck at stuttery 22 FPS, your machine is probably paging from disk. Open Task Manager, go to Performance, and watch the Memory graph while playing. If you’re consistently above 90% memory usage, that’s your problem and no setting will fix it. I’d add more RAM or kill background apps, not lower settings further. The nephew’s Dell looked exactly like this before the upgrade. New stick of RAM solved it.
Should I use Bloxstrap on a low-end PC?
I think Bloxstrap’s footprint is light enough to work fine on low-end hardware. It adds maybe 50MB of RAM overhead vs vanilla Roblox, a non-issue on 8GB but borderline on 4GB. I run Bloxstrap full-time on the Pavilion. On the Dell at 4GB I ran vanilla Roblox + rbxfpsunlocker because every megabyte mattered. After the 8GB upgrade, Bloxstrap was fine on the Dell too. The full breakdown is over at bloxstrap.com.
Does Performance Mode in Windows really help?
Yes, especially for thermals on older laptops. The Dell’s i5-7200U fan is earnest but underqualified. High Performance plus the visual effects tweak kept the CPU running its boost clock longer because Windows wasn’t asking the GPU compositor and a dozen background services to run at the same time. Sustained clocks are everything on a thermally-limited laptop.
Can I run Roblox on 4GB of RAM?
Yes, barely. The Dell at 4GB ran Brookhaven at a stuttery 22 to 30 FPS once we’d done all the settings work. Playable, not smooth. Adopt Me was rough because pets pushed memory past the threshold and the game would freeze each time. Bedwars was painful. If you’re stuck on 4GB and can’t upgrade, the realistic experience is casual Brookhaven, nothing competitive, lots of pagefile thrashing. The 8GB jump is the difference between putting up with Roblox and actually enjoying it.
What about NVIDIA Control Panel tweaks?
If you’re on a low-end NVIDIA card (a GT 1030 or an old MX150), there’s a separate set of driver-level tweaks worth doing. I covered those in my NVIDIA settings for Roblox piece. They’re irrelevant for Intel UHD or AMD Vega iGPUs, where Intel Graphics Command Center and Radeon Software expose far fewer useful knobs.
My Real-World Test Numbers (April 2026)
I want you to see the actual numbers because most low-end FPS guides pull figures from thin air. Same Brookhaven private server, same router, same time of day, three runs averaged per config.
| Config | HP Pavilion (i3-1115G4 + UHD + 8GB) | Dell (i5-7200U + HD 620 + 4GB → 8GB) |
|---|---|---|
| Default (Auto, 1080p windowed) | 32 FPS | 18 FPS / 28 FPS after RAM |
| + Q2 manual quality | 44 FPS | 24 FPS / 35 FPS |
| + 1280×720 res, fullscreen | 58 FPS | 30 FPS / 42 FPS |
| + High Perf power plan | 62 FPS | 35 FPS / 48 FPS |
| + Visual Effects perf mode | 64 FPS | 37 FPS / 50 FPS |
| + Background apps audit | 65 FPS | 38 FPS / 52 FPS |
| + rbxfpsunlocker uncapped | 66 FPS | 38 FPS / 53 FPS |
The pattern’s clear. Settings get you most of the way, Windows tweaks add a meaningful tail, and the unlocker is essentially negligible from a frames standpoint (its real value is letting you measure all this). On the 4GB Dell, the RAM upgrade was bigger than every other change combined. If you’re stuck under 30 FPS on a 4GB system, settings won’t save you. The fix is $20 and a Phillips screwdriver.
The nephew’s still using that Dell. I did the RAM upgrade in August 2025, the SSD swap in November, and a heatsink cleanup just before Christmas. Total spend over six months: $48, plus an afternoon of my time. The laptop went from “almost in the trash” to a serviceable Roblox machine for years to come. Low-end hardware in 2026 isn’t the wall it looks like at first. Settings matter. RAM matters more. Knowing the order of operations matters most.
If you’re still hitting walls, my best FPS unlocker for low-end PCs piece covers the tooling side, and the Roblox FPS unlocker pillar is the place for the broader picture across all hardware tiers.