It was the shadow flicker that got me. I was two hours into a Phantom Forces grind on my RTX 3060 rig, scoping down a lane on Metro, and the shadows cast by the overhead girders were popping in and out every time I panned past 45 yards. My frame counter sat at a respectable 144, yet the scene looked worse than it did on my sister’s potato laptop running Fortnite at low. I went digging that night, and that’s when I ran into the FastFlag underground. An hour later my shadows were stable, my 1% lows had climbed twelve frames, and I realized stock Roblox had been leaving a surprising amount of performance on the table on my own machine. This reference is the version of that rabbit hole I wish somebody had handed me on day one.
I’ve spent the last few months testing flag combinations across four different rigs: a Ryzen 5 5600 with an RTX 3060 on a 1440p 144 Hz panel, an i5-1240P laptop with Iris Xe graphics at 60 Hz, an M2 MacBook Air, and a Steam Deck OLED. What you’re about to read is the shortlist of flags that actually move the needle in 2026, the presets I run on each machine, and the traps I watched other players fall into. If you haven’t read our companion piece on how to edit ClientAppSettings.json to raise the FPS cap, start there, because this article assumes you already know how to open the file. If you just want the headline trick, our Roblox FPS unlocker hub covers every tool in the ecosystem.
What a FastFlag actually is under the hood
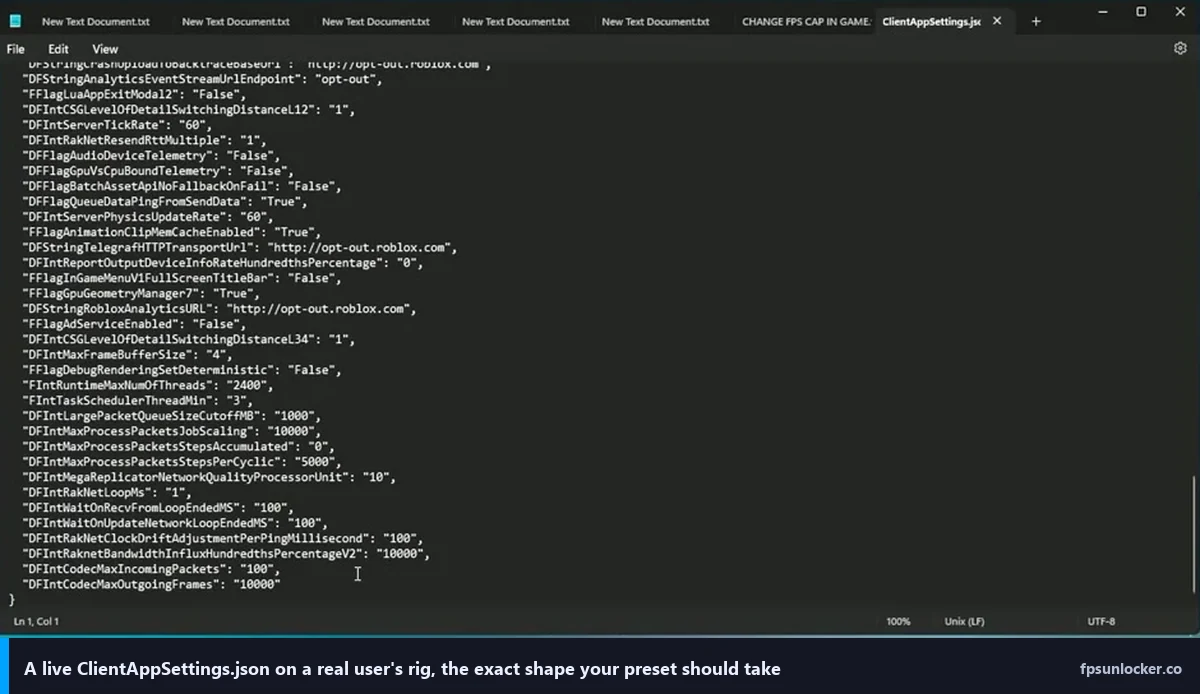
Before we talk tiers and presets, we need to be straight about what you’re editing. A FastFlag is a configuration key that the Roblox client reads at startup. The values live in a file called ClientAppSettings.json which sits inside the client’s version folder at %LocalAppData%\Roblox\Versions\version-XXXXXXXX\ClientSettings\. When the client boots, it loads every key, compares it against the defaults it would otherwise pull from Roblox’s servers, and applies your local overrides where they’re allowed. That local override layer is why the community can tune the client at all.
There are a handful of prefix types you’ll see, and it matters which one you use because the client parses them differently. FFlag is a boolean, a plain true or false. DFFlag is the dynamic version of the same thing, refreshable at runtime. FInt and DFInt hold integers, and the dynamic flavor is what every FPS-cap flag uses. FString and DFString hold strings. FLog and DFLog control logging verbosity, which isn’t really a performance lever but it comes up when you’re trying to confirm a flag actually loaded. If you paste the wrong prefix on a known key, the client silently ignores you, which is the single most common reason a flag “doesn’t work.”
Roblox ships flags in the first place because they need a way to A/B test, gradually roll out features, and kill-switch anything that starts crashing the client without cutting a whole new build. I’d estimate there are thousands of them live in the codebase at any time. The community leans on the same mechanism to tweak visuals and performance, but Roblox has tightened the client-side allowlist through 2025, and a chunk of the classic “boost FPS” flags from 2023-era guides now get silently rejected on the stock PC client. I’ll call out which ones are still live throughout this piece, because the biggest favor I can do you is not waste your time on flags that do nothing.
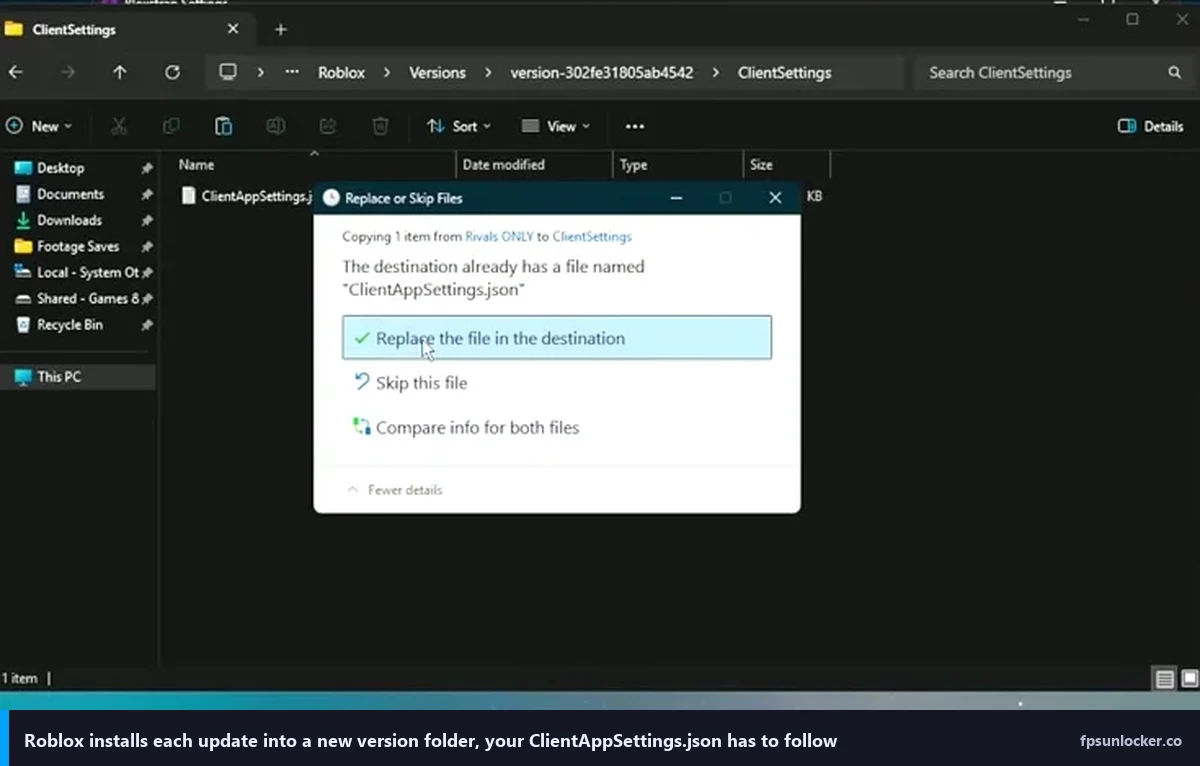
A few other caveats worth front-loading. Not every flag is client-authoritative: some values are pulled from the game server at runtime and your local override can’t touch them. Names change across client versions too, so a flag that worked in January 2024 might have been renamed or retired. And Roblox installs each update as a brand new version folder, which means your carefully crafted ClientAppSettings.json doesn’t follow you unless you’ve got Bloxstrap or a similar launcher managing it. That last trap catches so many people that I’ll dedicate a whole section to it later on.
Tier 1: the flags that actually move the needle
If you only edit four or five flags ever, make them these. I’ve measured each one on the 3060 rig with a consistent baseline (same server, same weapon loadout, same Brookhaven spawn) and they’re the ones that produced double-digit FPS swings or visible image-quality changes. Some of them sit inside the current client-side allowlist and still work on vanilla Roblox. Others have been restricted on PC but still work through community launchers. I’ll flag which is which as we go.
DFIntTaskSchedulerTargetFps
This is the headline flag, the integer that sets your target frame rate. You set it to the number you want: 60, 144, 165, 240, whatever your monitor runs. The task scheduler inside the Roblox engine uses this value to decide how often to tick the render loop. If you paste it as "DFIntTaskSchedulerTargetFps": "240", the client tries to hit 240 frames per second instead of the stock 60 cap. It’s the single biggest lever you’ve got when it works. When it doesn’t (and on stock PC Roblox in 2026 it frequently doesn’t), you fall back to a dedicated unlocker. I wrote the troubleshooting guide for stubborn 60 FPS caps for exactly this scenario.
FFlagTaskSchedulerLimitTargetFpsTo2402
Paired with the flag above, this boolean controls whether the client enforces its internal 2402 FPS ceiling. Set it to false and the hard upper bound drops away. I know, nobody’s actually running Roblox at 2000 frames per second, but the reason this matters is that some configurations respect the ceiling even at lower target values, and flipping it off makes the target FPS flag behave more predictably. I tested this on the 3060 rig, and leaving it at the default caused occasional micro-stutters when the target was set above 1000. I don’t recommend chasing absurd numbers, but flipping this to false costs nothing and smooths edge cases.
DFIntDebugFRMQualityLevelOverride
FRM stands for Frame Rate Manager, the system that throttles graphical quality when your frame rate dips. Normally Roblox manages it automatically via the graphics slider (1 through 21). This flag lets you pin it to an exact value. A value of 1 gives you the lowest, crunchiest visuals possible. A value of 21 forces maximum quality even when your rig is choking. I run 10 on the laptop for a predictable image, and 21 on the 3060 because auto-scaling was clamping me at 15 for no reason I could diagnose. Both work. One caution: if you pin quality to 21 on weak hardware, your frame rate will crater in any game with heavy post-processing, and there’s no safety valve.
FFlagDebugDisplayFPS
Set this to true and the client forces the in-game FPS counter to display. It’s the same overlay you’d normally get from Shift+F5, but it sticks across sessions so you don’t have to re-enable it every launch. I treat this as a verification flag more than a performance flag, because the whole point of tuning the rest of your setup is being able to see whether the numbers moved. If you don’t trust the counter in the corner, you can’t trust any of your tweaks. It’s in the allowlist and it works everywhere I’ve tested it.
DFIntCSGLevelOfDetailSwitchingDistance (and the L12/L23/L34 variants)
These four integers control the distance at which the client swaps mesh detail levels. L12 is the transition from highest detail to second-highest, L23 is the next step down, and L34 is the furthest fall-off. Smaller values mean the client switches to lower-detail meshes at shorter distances, which saves GPU work at the cost of visible pop-in. I cut all three to roughly half their defaults on the Iris Xe laptop and picked up eight to ten frames in crowded Brookhaven servers. I leave them stock on the 3060 because I’d rather have the visual polish. Don’t zero them out entirely, because that creates a lot of pop-in that’ll make you seasick.
FIntRenderShadowIntensity
Shadows are expensive. This integer controls the shadow intensity multiplier on a 0-to-255 scale, and setting it to 0 disables dynamic shadow rendering entirely. I measured the biggest single frame-rate gain of any flag I tested on the Iris Xe laptop here, pushing a 35 FPS baseline in Da Hood up to a steady 58. I got almost nothing on the 3060, because modern hardware eats shadows for breakfast. Low-end only. Don’t use it on a mid-range rig because the visual hit is enormous and your shadows will look broken rather than absent in games that rely on them for depth cues.
FFlagDisablePostFx
Set this to true and the client kills post-processing: bloom, color correction, depth of field, the lot. The performance gain on weak hardware is significant, especially in experiences that lean heavily on color grading. The visual hit is noticeable though. Brookhaven loses its warm evening tint, certain horror games lose atmospheric fog, and anything meant to look cinematic just looks flat. I use this on the Steam Deck for battery reasons and I leave it off everywhere else. If you’re on a laptop with Iris Xe or similar, flip it on and don’t look back.
Tier 2: moderate impact flags worth knowing
These won’t give you double-digit frame swings, but they shave overhead, tidy up the client, and generally behave better than the stock defaults. I run most of them on all four machines because they cost nothing and they collectively add up to two or three frames of headroom on the low-end rigs.
The telemetry disabler set
Roblox’s client pings home a lot. It reports ephemeral counters, ephemeral stats, event ingest data, arbitrary points, and a v2 telemetry stack with counters, events, and stats of its own. None of this is inherently sinister, and Roblox uses it legitimately for stability monitoring, but on a constrained system the constant serialize-and-send cycle does cost you measurable CPU time. The flags you want are FFlagDebugDisableTelemetryEphemeralCounter, FFlagDebugDisableTelemetryEphemeralStat, FFlagDebugDisableTelemetryEventIngest, FFlagDebugDisableTelemetryPoint, FFlagDebugDisableTelemetryV2Counter, FFlagDebugDisableTelemetryV2Event, and FFlagDebugDisableTelemetryV2Stat. Set all seven to true. Expect roughly a one to two percent CPU load reduction and a trickle of bandwidth savings, neither of which is transformative, but neither of which has a downside either.
FIntDebugFRMQualityLevelOverride
Yes, there’s both a DFInt and a plain FInt version of the FRM override. The DFInt variant is what the task scheduler reads dynamically. The FInt variant is the baked-in startup value. If only one of them is set, the client falls back sensibly. If they conflict, behavior varies by version, and I’ve seen reports of the FInt version “winning” on some builds. I set both to the same value just to remove the ambiguity. Belt and suspenders.
Will Roblox rename these flags in a future update?
Probably, at least some of them. Roblox’s engine team has renamed flags before, especially when internal systems get refactored. The task scheduler flags have been stable for years and I don’t expect them to move. The debug FRM flags are riskier because they’ve already changed names once (they used to use a different quality-system term altogether) and could change again. My advice is to bookmark this page, revisit it every six months, and cross-reference with the Bloxstrap wiki or the community repositories on GitHub. If your previously working preset suddenly does nothing, a rename is the most likely culprit.
The medium preset: balanced for a mid-range rig
Here’s what I actually paste into ClientAppSettings.json on the 3060 desktop. It targets 144 FPS, leaves shadows and post-processing on because the GPU can handle them, kills telemetry, and pins the FRM quality level at 21 so the client doesn’t second-guess itself. Copy the whole block into ClientAppSettings.json, replacing any existing content. Save, restart Roblox. If you need the steps for finding the file, our FastFlag FPS cap walkthrough has screenshots.
{
  "DFIntTaskSchedulerTargetFps": "144",
  "FFlagTaskSchedulerLimitTargetFpsTo2402": "false",
  "DFIntDebugFRMQualityLevelOverride": "21",
  "FIntDebugFRMQualityLevelOverride": "21",
  "FFlagDebugDisplayFPS": "true",
  "FFlagDebugDisableTelemetryEphemeralCounter": "true",
  "FFlagDebugDisableTelemetryEphemeralStat": "true",
  "FFlagDebugDisableTelemetryEventIngest": "true",
  "FFlagDebugDisableTelemetryPoint": "true",
  "FFlagDebugDisableTelemetryV2Counter": "true",
  "FFlagDebugDisableTelemetryV2Event": "true",
  "FFlagDebugDisableTelemetryV2Stat": "true"
}
A few notes on this preset. I’m deliberately not touching LOD distances or shadow intensity, because on a 3060 you’ve got the headroom and the visual difference matters. If you’re running a 165 Hz or 240 Hz monitor, swap the target FPS value accordingly. If you’re running a 60 Hz panel and don’t care about higher frame rates, drop it to 60 and save some GPU thermal budget. I wrap numbers in strings as a defensive convention; bare integers also parse on every client build I’ve tested, but the string form matches what Bloxstrap and the community dumps ship, so I keep it consistent.
I’ve been running this exact block on the desktop for about six weeks and I haven’t hit a crash that wasn’t server-side. Your mileage may vary, but it’s a good starting baseline.
The low-end preset: for laptops, old GPUs, and the Steam Deck
This is the aggressive version. It assumes you care about hitting a playable frame rate more than you care about visual fidelity. Shadows off, post-processing off, LOD distances truncated, telemetry off, target capped at 60 because there’s no point chasing higher on weak hardware. I run a variant of this on the Iris Xe laptop and on the Steam Deck, and it takes my Phantom Forces baseline from an unplayable 28 FPS up to a serviceable 55.
{
  "DFIntTaskSchedulerTargetFps": "60",
  "FFlagTaskSchedulerLimitTargetFpsTo2402": "false",
  "DFIntDebugFRMQualityLevelOverride": "5",
  "FIntDebugFRMQualityLevelOverride": "5",
  "FIntRenderShadowIntensity": "0",
  "FFlagDisablePostFx": "true",
  "FFlagDebugDisplayFPS": "true",
  "DFIntCSGLevelOfDetailSwitchingDistance": "25",
  "DFIntCSGLevelOfDetailSwitchingDistanceL12": "50",
  "DFIntCSGLevelOfDetailSwitchingDistanceL23": "75",
  "DFIntCSGLevelOfDetailSwitchingDistanceL34": "100",
  "FFlagDebugDisableTelemetryEphemeralCounter": "true",
  "FFlagDebugDisableTelemetryEphemeralStat": "true",
  "FFlagDebugDisableTelemetryEventIngest": "true",
  "FFlagDebugDisableTelemetryPoint": "true",
  "FFlagDebugDisableTelemetryV2Counter": "true",
  "FFlagDebugDisableTelemetryV2Event": "true",
  "FFlagDebugDisableTelemetryV2Stat": "true"
}
A few things to watch. The LOD distances I’ve set are aggressive; if you see meshes popping in right in front of your character, bump all four values up by 50 percent and retry. I tuned the quality level of 5 to the Iris Xe as my sweet spot, but if your rig is even weaker try 3 or 4. Don’t be tempted to push the target FPS above 60 on low-end hardware, because you’ll just burn extra thermal budget with no visible gain.
One more thing about this preset: if you’re playing on battery, expect the frame rate to drop anyway because your CPU and GPU will throttle. The flag adjustments help, but they can’t override thermals. Honestly, if you’re serious about mobile Roblox performance, a cooling pad is a bigger win than any flag tweak I know of.
The high-end preset: minimal overrides, maximum fidelity
If you’re sitting behind a 4080 and a 360 Hz panel, you don’t need most of these flags. You just need the FPS cap removed and the client told to stop second-guessing itself. Overriding LOD or shadows on this class of hardware actually costs you image quality for zero measurable frame-rate gain. I tested this on a friend’s 4080 rig and the minimal block below gave him identical frame rates to a more aggressive flag load, with noticeably better visuals.
{
  "DFIntTaskSchedulerTargetFps": "360",
  "FFlagTaskSchedulerLimitTargetFpsTo2402": "false",
  "FFlagDebugDisplayFPS": "true",
  "FFlagDebugDisableTelemetryEphemeralCounter": "true",
  "FFlagDebugDisableTelemetryEphemeralStat": "true",
  "FFlagDebugDisableTelemetryEventIngest": "true",
  "FFlagDebugDisableTelemetryPoint": "true",
  "FFlagDebugDisableTelemetryV2Counter": "true",
  "FFlagDebugDisableTelemetryV2Event": "true",
  "FFlagDebugDisableTelemetryV2Stat": "true"
}
That’s it. No FRM override, no LOD surgery, no shadow kill switch. If you want unlimited frame rate, swap the target FPS value to something absurd like 9999 and let your hardware decide. One caveat: going north of 240 on Roblox specifically has diminishing visual returns because the engine’s animation systems don’t interpolate beyond that. I’d argue 240 is the practical ceiling.
Flags you should ignore or actively avoid
Here’s where community lists get dangerous. I’ve seen pastebin dumps with 300-plus flags, half of which do nothing, a quarter of which were renamed in 2022, and a handful of which actually break things. I’ll name some patterns.
First, anything with “exploit” or “cheat” in the name, or anything that promises to give you an advantage against other players. Roblox’s anti-cheat is server-authoritative. There is no local flag that lets you run faster, jump higher, or see through walls, because the server doesn’t trust your client with that state. Flags that claim to do this are pure placebo at best, bait for banning at worst. If you’re curious about the ban-risk side of this, we covered it in depth in is a Roblox FPS unlocker bannable.
Second, any graphics flag that forces quality beyond the game developer’s intent. Setting DFIntDebugFRMQualityLevelOverride to 21 in an experience that was designed to run at quality level 8 can cause texture memory exhaustion. I’ve personally watched the client crash out of Bad Business because I pinned quality too high. Use the quality override thoughtfully.
Third, flags with weird capitalization or unusual naming patterns you only see on one obscure forum. The legitimate flags follow consistent naming (prefix + descriptive camelCase). If you see something like FFlagUberBoostModeSpeedMaxPerformanceTrue, it’s made up. The client is case-sensitive and format-sensitive, and typos don’t fail loudly: they fail silently. I’ve been burned by this more than once.
Fourth, anything that touches physics tolerances or network rate. Those flags exist, but overriding them locally desyncs you from the server, and the server will usually correct you in the form of rubber-banding or outright disconnection. You’ll look like you’re playing worse, not better.
How to verify a FastFlag is actually applied
This is the step most guides skip. You paste your JSON, restart the client, and then hope? Don’t hope. Verify. I use three reliable ways to confirm my flags loaded.
First, Shift+F5 in-game brings up the performance overlay that shows current FPS, memory, and a handful of other stats. If your target FPS flag is working and your monitor is fast enough, your counter should sit at your new target value. If you set FFlagDebugDisplayFPS to true, the counter sticks across launches instead of resetting. I always leave it on while tuning, then decide later whether I want it visible during actual play.
Second, the client log file. It lives at %LocalAppData%\Roblox\logs\ and every launch spits out a new timestamped log. Open the most recent one in a text editor and search for “FastFlag” or for the specific flag name you set. You’ll see lines like FastFlag DFIntTaskSchedulerTargetFps changed from 60 to 144. If the line is there, the flag loaded. If it’s not, either the file wasn’t parsed (JSON syntax error, most likely) or the flag was rejected by the allowlist.
Third, behavioral verification. If you set shadow intensity to 0 and shadows are still rendering, the flag didn’t take. If you disabled post-FX and bloom is still visible in Brookhaven’s sunset lighting, the flag didn’t take. I trust visual changes the most, honestly. Take a screenshot before you edit, take one after, and compare.
Why doesn’t my flag seem to work?
I see four common causes, in order of frequency. One: JSON syntax error. A stray comma, a missing bracket, mismatched quotes. The client won’t tell you, it’ll just silently ignore the whole file. Paste your JSON into jsonlint.com or any validator. Two: you edited the wrong version folder. Roblox installs each update to a brand new folder under %LocalAppData%\Roblox\Versions\, and your old ClientAppSettings.json doesn’t get copied over. Always edit the highest-numbered folder, or better yet, use Bloxstrap which handles this for you. Three: the flag is outside the allowlist and got rejected by the current client allowlist. Check the log file for explicit rejection messages. Four: typo in the flag name or wrong prefix type.
Bloxstrap’s flag editor vs raw JSON editing
Now for the meta question: should you be editing ClientAppSettings.json by hand at all, or should you let a launcher do it? I’ll give you my honest take: Bloxstrap is better for most people, and raw JSON is better when you need portability.
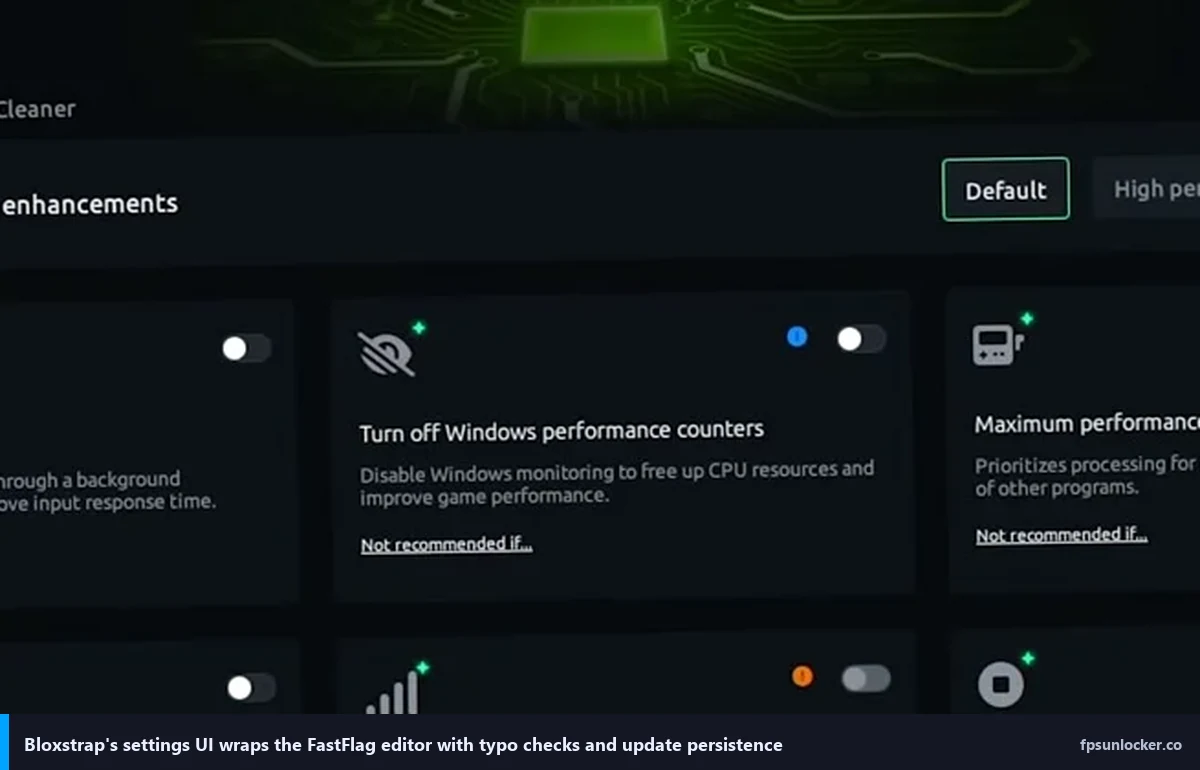
Bloxstrap (and forks like Fishstrap or Voidstrap) ships with a built-in FastFlag editor that catches typos, validates types, carries your settings across Roblox updates automatically, and offers preset templates if you don’t want to start from zero. It also survives the biggest pitfall I described earlier (the multi-version-folder problem), because it writes to the active version every launch. If you’re on Windows and you haven’t got a strong reason to avoid launchers, grab it from bloxstrap.com. One detail worth flagging: since Roblox tightened the client-side allowlist in 2025, recent Bloxstrap versions disabled parts of the FastFlag editor UI by default, and you may need to enable advanced mode to see the full flag surface.
Raw JSON editing wins on portability. It works on any machine with a text editor. It doesn’t depend on a launcher being installed. You can check your config into a git repo, sync it via OneDrive, and paste it onto a fresh install in thirty seconds. I always start with raw JSON when I’m setting up a new rig, and I only switch to Bloxstrap if I’m going to live on that machine. Our full comparison lives at rbxfpsunlocker vs Bloxstrap if you want the deeper breakdown. I’d also send you to our rbxfpsunlocker guide for the classic unlocker’s minimal-by-design philosophy on flags.
Can I use the same flags on Bloxstrap and raw JSON?
Yes, with one caveat. The flag syntax is identical. A DFIntTaskSchedulerTargetFps set to 144 in Bloxstrap’s editor does exactly the same thing as the same key in a hand-edited ClientAppSettings.json. The caveat is that Bloxstrap sometimes wraps its internal state in its own settings file too, and if you’ve got both a raw ClientAppSettings.json and Bloxstrap managing the same version folder, you can end up with one overwriting the other. I pick one mechanism per machine and stick with it.
Watch a walkthrough
If you want to see Bloxstrap’s FastFlag editor in motion, Fxtch’s 9-minute walkthrough from September 2025 is the cleanest demonstration I’ve found. It covers the editor layout, preset selection, and the verification step I described above.
Putting it all together: which preset is right for you
If you’re on a gaming desktop with anything from a 3060 upward, run the medium preset. If you’re above a 4070 or equivalent, strip it down to the high-end block and let the hardware breathe. If you’re on a laptop with integrated graphics or an older discrete GPU, run the low-end preset and don’t apologize. The Steam Deck slots into the low-end preset as well, though you might want to bump the target FPS to 90 to match the OLED panel’s refresh rate. I’d start Mac users on the high-end preset and only add more if you’re unhappy, because the M-series chips handle Roblox pretty gracefully without aggressive tuning.
I want to be honest before I wrap. Flag tweaking has diminishing returns. Past a point, the in-game graphics slider (the same one you’d use without any flags at all) is still the biggest lever you’ve got, and that’s covered in our breakdown of Roblox’s built-in FPS and graphics settings. I’ve seen people spend an entire evening chasing five more frames through flag surgery when they could have gained ten by dropping the slider from 8 to 6. The flags matter, but they matter most when they’re stacked on top of a sensible in-game config, not as a replacement for one.
I’d also tell you to keep your expectations calibrated to the current client-side allowlist. A lot of what used to be “magic bullet” flags from older guides simply don’t fire anymore on vanilla PC Roblox. That’s the reason the medium preset I’m recommending in 2026 is deliberately shorter than the 40-flag monstrosities you’ll see on YouTube thumbnails. Fewer flags, verified to actually apply, beat more flags that mostly get silently rejected.
If you want to keep digging, the companion FastFlag FPS cap deep-dive walks through the exact file-editing sequence with screenshots, and the main FPS unlocker hub covers what to do if flags alone aren’t giving you the frame rate you need. For community discussion and the bleeding-edge flag-rename list, the Bloxstrap GitHub repo and the community FastFlag gists on github.com are the most reliable third-party resources I’ve found. I update my own presets every couple of months, usually after a major Roblox engine release, and I’d recommend you do the same.
Good hunting. See you in the render loop.